Synth Basics- Common Modules

This week I want to take a first look at synthesis and some of the common building blocks used. To begin with, there are several different types of synthesis- subtractive, additive, FM(Frequency Modulation), wavetable, physical modeling, granular, and hybrid combinations of all these. Although all of these synth types share some common parameters I’ll restrict myself to the modules found in all subtractive synths in one form or another. Subtractive synthesis refers to the process of taking a waveform, running it through a filter or set of filters, applying envelopes to control the dynamics of the sound, adding an LFO(low frequency oscillator) for modulation, and then creating an output at a certain volume or pan position…and even this can be modulated!

For this lesson I’m going to be using Cakewalk’s Z3TA+2 synth-
Zeta

There are five modules common to all synths and I’ll go through them one at a time-

1- OSC or oscillator- The oscillator section is the sound generator for the synth. In an analog synth this would be called the VCO(Voltage Controlled Oscillator). The actual sound source is a selectable waveform…some types you would expect to see are Sine, Triangle, Square, and Sawtooth. Usually you’ll find a frequency control which is directly related to the pitch of the sound.
Osc

2- Filter- The filter section is where the partials of a waveform are either attenuated or emphasized according to the type of filter applied. The main filters are LPF(low pass filter), HPF(high pass filter), BPF(band pass filter), and Notch(also called Band Reject). A couple of controls you’ll always find are Cut-off Frequency(the frequency at which the sound is starting to be affected by the filter) and Q(also called Reso or Resonance) which creates an emphasis at the cut-off. In an analog synth this would be referred to as the VCF(voltage controlled filter).
Filter

3- Amp- The amp section is basically the output section of the synth. The master volume and pan controls are found here. In an analog synth this was called the VCA(voltage controlled amplifier).
Output

4- EG- The EG(Envelope Generator) section affects how the sound evolves over time. At times this section is called by the initials of it’s controls- ADSR(Attack, Decay, Sustain, Release). Attack controls how quickly the sound goes to 100% when the key is pressed…a percussive sound would be set to 0% while a pad would have a longer time. Decay refers to how quickly the sound falls to a Sustain level. That percussive sound would have an a very low decay while a pad may take longer to fall. Sustain is the only control to have a level rather than a time….sustain is the level the sound falls to after the attack and decay stages while the key is still being pressed. Finally Release controls the amount of time it takes for the sound to completely fade after the key is released. Back to our examples the percussive sound would have no release time while the pad would have a period of time for the volume to fade.
EG

5- LFO- The LFO(low frequency oscillator) is used as a modulator for the other sections. Though the low in an LFO refers to the fact that the frequency is set below the human hearing level but being a periodic waveform it can be used to modulate many of the other synth controls resulting in a more “animated” sound. Generally you can set the type of waveform and amount.
LFO

Each of these sections deserve a post of their own so hopefully I covered the main details and didn’t confuse anyone too much!

See you soon 🙂

-Bill

Posted in Software, Theory, Tutorial | Tagged , , , | Leave a comment

Comparing Algorithmic and Convolution Reverb

Most people in the audio community are aware of the use and importance of reverb in the recording/mixing/mastering pipeline but when it comes to differentiating between the two main types of reverb the details start to blur. Today I’m going to explain a bit about the two types of reverb and discuss the pros and cons of using each.

The first form of reverb we’ll look at is algorithmic reverb. An algorithim is a mathematical process used to explain and emulate something in real life. Algorithmic reverb is the traditional and oldest form of reverb. The elements that make up a reverb are studied and then using these data as a model, hardware or software reverb is engineered that allows the user to affect these elements in order to control the resultant sound. Although there are numerous different algorithmic reverb units on the market there are certain characteristics and controls they all share. For an example we’ll look at the Waves TrueVerb interface-
sshot_big_trueverb01

One of the first common controls is Room Size. Room Size should be self-explanatory…the larger the room the stronger the reverb effect. The next control is Pre-delay which refers to the amount of time before the reverb effect begins…imagine recording through a mic in a room. Before we would hear any reverb from the room we would hear the direct sound at the mic, Pre-delay lets us emulate that. Another common control is the Wet/Dry Mix which here is split into three controls- Direct- the dry sound or pre-effect sound.
Early Ref- called early reflection, this refers to the first thing heard as a sound reflects off a surface- more along the lines of an echo or slapback effect.
Reverb- this is the full wet or affected sound.

Algorithmic Reverb is perhaps the easiest to control and use.

Now we’ll dive into Convolution Reverb. Convolution reverb uses real spaces through the manipulation of impulse files or impulse tones depending on how they are referred to in the reverb. Impulse tones are created by recording a test tone in a real physical space and then removing that test tone. What’s left is then applied as a modifier on your digital audio. For an example I’ll share the interface from Waves IR-1-
sshot_big_IR1v2

Convolution reverb units have fewer user controls but they have much more detail and accuracy. Generally, convolution reverbs are only used when realism is desired and processor power is not in question. Some reverb plugins let you create your own impulse tones and there are third-party developers that market impulse tones. The tones themselves are quite large files so hd space is another factor to take into account.

Well that’s it for this time…hopefully you’ll come away from this with a better perspective on reverb and be more prepared to use the tools rather than let the tools use you!

-Bill

Posted in Theory, Tutorial | Tagged , , | Leave a comment

Home, Home On the ….. Dynamic Range??!!

I thought I would take a few moments and talk about Dynamic Range. To begin, let’s define what we are talking about when we discuss Dynamic Range. “Dynamic”, refers to change, and “Range”, refers to a set of values with a defined upper and lower limit of some sort. Dynamic Range is used in a variety of fields- ie. the light range of total bright to total dark in digital photography. I’m going to restrict this lesson to audio only to make it more relevant to the audio production world.

In audio we can look at Dynamic Range in a couple of different ways. The Dynamic Range of hearing is one of these and is referred to as dBSPL(decibel sound pressure level). We use a value of 0dBSPL as the absolute of absence of human detectable sound and around 130dBSPL as the pain threshold. This scale is logarithmic, not linear, so as the dBSPL increase they do so exponentially. Luckily for us our hearing actually translates that exponential increase as a linear value so volume increases are a smooth transition.

The second way we refer to Dynamic Range is in the Recording/Mixing/Mastering process. In the digital realm we have a different scale to help us avoid noise yet make the sound as loud as possible other than for dynamic concerns. This scale runs from -inf(negative infinity- basically a complete absence of sound) to 0db(the point at which digital audio starts distorting). Bear in mind that -inf is a theoretical location, due to equipment and other background noise we never really have a total absence of sound. Now the upper limit of this background noise area is called the Noise Floor and above this up to the 0db is referred to as our usable range. This is the area we use to record and mix. Most recordings nowadays are mastered at -3db up to almost 0db so generally recordings are recorded and mixed at a lower level in order to leave room for the volume increase due to processing. In a 24-bit environment I try to record at anywhere from -24db to -12db depending on the amount of mix processing I’ll be applying. You’ll have to experiment in order to figure out how to leave yourself the proper amount of headroom, headroom denoting the space between your recording level and 0db.

Hopefully this discussion helps in the understanding of how important Dynamic Range is to digital audio and also how it relates to our hearing. Till next time…

-Bill

Posted in Theory, Tutorial | Tagged , , | Leave a comment

The Importance of the Submix

Hearkening back to the early days of audio recording, the use of the submix has grown from one of absolute necessity to one of choice. In the beginning recording engineers were restricted to a couple of tracks of audio. To add other musical parts the engineer would mix down his current tracks in order to have an empty track for the next recording. Originally recording was done on an analog 2-track recorder which progressed in time to 4-track, then 8-track, to 16-track, finally resulting in 24-track analog recording. Once digital technology started taking over track count started growing, 24 became 32, 32 became 64…a 128 track ProTools HD system is not quite the oddity it might have once been. Now these numbers refer to recording analog audio, when your audio source is “in the box” like software instruments, your track counts are only limited by your DAW, processor, and RAM!

Nowadays the submix has become an effective tool to group similar instruments, lighten the processor load by applying FX to a group of instruments rather than using separate FX instance for each track, and generally just reduce screen clutter and make track automation that much easier to handle. I’ll show you a project of mine that has a group of drum tracks routed to a single buss and explain how it works and why I chose to mix this way.

I work with a dual monitor setup in Cakewalk Sonar X2 Production Edition so I’ll show each monitor separately. I like to run Track View on the left monitor-
Track-view

On the right monitor I have the Console View open-
Console-View

In this lesson I’m using an Auxiliary Buss to route all my drums. Normally when you create a track the default output is the Master Buss which feeds your soundcard’s main outs. I chose to create an Aux. Buss for the drums so that I could manipulate the drums as a whole rather than having to effect each drum track individually. The output of the Drum Buss is routed to the Master Buss so the drums are still part of the mix just as if they were individual tracks. The reason I created the Drum Buss in the first place is that I wanted any volume changes, reverb, and other assorted processing to be consistent for the drums as a whole. When I mix I try to imagine a roomful of musicians playing live and then try to simulate that “live” feel and sound.

The submix is an easy concept but can become obscure with a rather long-winded explanation… 😉

Thanks for taking the time to read this article, I’m hoping it will help someone just starting out with digital audio!

-Bill

Posted in Software, Theory, Tutorial | Tagged , , , , , | Leave a comment

Creating a New Project in Sonar X2 Producer Edition

Today I’d like to introduce you to my method of creating a new recording project in Sonar. I’ll also show you how to set up your sample rate, bit depth, project folder location, and further, how to form a default project for each time you start a new recording project that already contains all of your audio settings. Let’s get started!

The first thing we are going to do is open Sonar. We are immediately presented with this screen-
Sonar Start

This menu allows us to open a previous project, start a new project, and view tutorial resources. For our purpose we’re going to choose Create a New Project. Before the interface opens we need to choose a project template and give the project a name-
New-Project-settings

Personally at this point I chose the Normal template and chose the Store Project Audio in its own Folder option. The reason to store audio in the project folder is that as you create more and more projects a system audio folder would become very confusing and quite unmanageable! Plus, using a single folder for all your project work will make it that much easier to share and collaborate with others. Now that we have completed our initial setup we can get into the nitty gritty. For the project name I would suggest you use “Default” as this will be the default project for every recording project you create once we are done with the audio, driver, and project settings. Don’t worry about the save locations right now as we’ll be fixing that later on.

Ok, let’s dive into some settings now! With the interface finally opened go to Edit/Preferences to allow us to adjust all our settings. We’ll start with the Audio section first. First up we want to choose our I/O devices, here referred to as Recording and Playback. Make sure you check all the inputs and outputs you will be using.
Audio-devices

Now that we have our device selected, let’s adjust our driver settings-
Driver-settings
Here’s where we find the Sample Rate and Buffer settings. Personally I prefer recording at 96khz but you’re going to have to make your own “bargain with the devil”…there’s a lot of discussion about using the higher sample rates and whether there’s a noticeable difference, you’ll have to do your own research and make your own choice. However, one truth to realize is that the higher the sample rate the larger the audio file sizes!

You may have noticed that there’s an ASIO panel in the center of the driver settings pane. This where the buffer setting is made.
Buffer-settings

You’re going to have to experiment to know what buffer setting to use. It all depends on your soundcard and your sound sources. Due to the fact that I record at 96khz and use a lot of VST instruments 512 works out great for me. Latency is negligible and I’m able to use audio processing as I progress. Take your time, you should only have to set this once.

Next stop is Playback and Recording-
driver-mode
This is the place to set your Driver Mode. Choices include MME(worst in my opinion), WDM(windows own audio driver model), and ASIO(best-Audio Stream Input/Output driver created by Steinberg). Once again you’re going to have to experiment to see which driver mode is best for your soundcard.

Now let’s choose our Midi input and outputs-
Midi-IO
To simplify things make sure you only choose devices you are actually going to utilize.

We’re going to look at some folder options now. By default Sonar places certain program related files in certain folder locations, there’s really no need to change these-
program-file-locations

There’s still something important we haven’t gotten to yet but we’ll take care of that now- bit depth. You’ll find that here under the Folder options-
Bit-depth
If you look below the bit depth settings you’ll also see the Use Per Project Audio Folders, we definitely want to make sure this is checked! Now the thing to remember about your bit depth setting is that using 24-bit as opposed to 16-bit will increase your sampling accuracy and dynamic range.

Another important setting is how the metronome works. You can set that here-
Metronome

We also need to set our clock source whenever we are working with external equipment. Our clock settings are here-
Clock

Now that we have the most important settings set we’re going to use the File/Save As in order to save our new Default project to a folder of its own. Next time you want to start a new project just open the Default project you created and use Save As to a new folder once you have a name picked out. It’s a huge time saver to avoid having to setup your project and audio settings every time you start a new one!

Finally I’ll just show you how I have my project folders set up. My DAW has 5 harddrives, approximately 4.1TB of space…a Windows and Programs drive, 2 sample drives, a Project drive, and an external drive for docs, manuals, etc. Here’s a look at my Project drive-
Projects-Folder

Inside one of the project folders looks like this-
Inside-Project-folder

And lastly the inside of the audio folder looks like this-
Inside-audio-folder

Hopefully the information here will help you no matter what DAW you use. A lot of choices are made by personal preference and opinion, these just happen to be mine. Thanks for staying awake 😉

Bill

Posted in Software, Tutorial | Tagged , , , , , | Leave a comment

Audio Signal Flow

Too often we get caught up in the details and complexities of the modern studio and forget the basics that are the backbone of music production. I’d like to take a moment and explain how the physical sound sources are cabled to the computer for recording and processing.

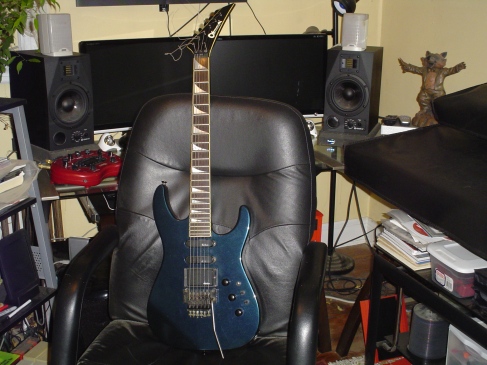
To begin, I have two different types of sound sources- one being my electric guitar Image

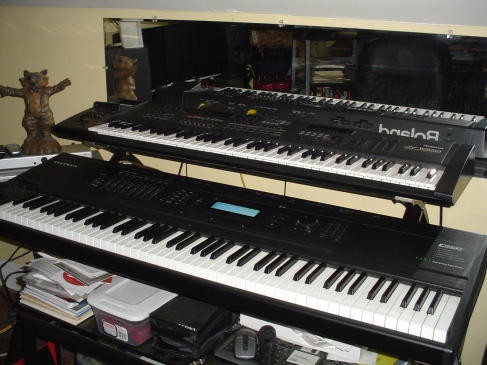
an ’89 Charval Mod 6, and the other being a couple of Midi keyboards Image

a Roland JV-1000(top) and a KurzweilK2500XS(bottom).

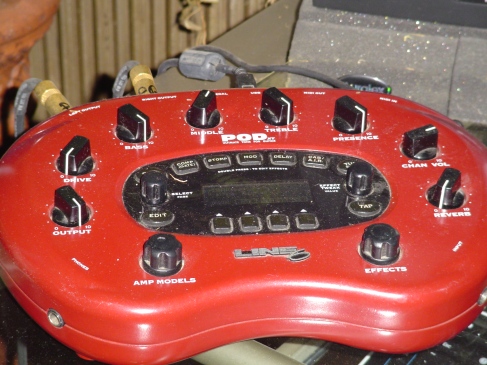
We’ll start with the guitar hook-up. A 1/4″ instrument cable runs from the output jack of the guitar to the instrument input of a Line6 Pod XT guitar processor.Image

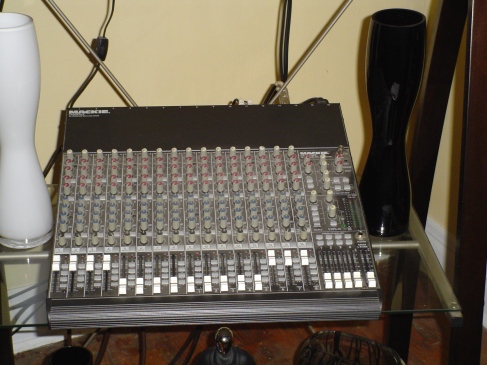
From the Pod XT I run two 1/4″ balanced mono cables to input channels 14 and 15 of a Mackie Cr1604-VLZ mixer. Image The reason for the two cables out from the guitar processor is that certain effects convert a mono signal to a stereo one(ie. reverb and delay), so the two cables actually work as a left and right channel. Before we get from the mixer to the computer let’s go back and take a look at the keyboards.

The Roland has a straight forward output section. A separate 1/4″ TRS connects the left and right channels to channels 1 and 2 on the mixer. The Kurzweil on the other hand has a KDFX effects unit installed that creates 8 mono/4 stereo outputs that are user configurable. This allows for a lot of routing flexibility…but I do all my processing “in the box” so I just use the two main outputs in the same manner as the Roland. These go to channels 3 and 4 on the mixer.

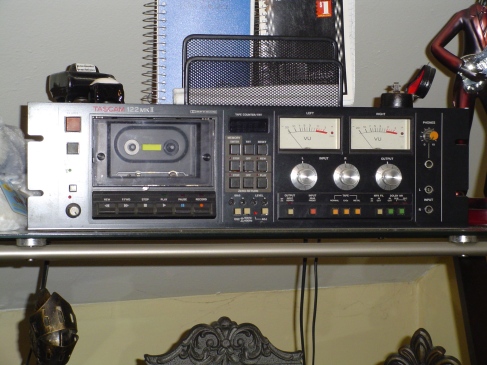
As a side note, I do have a Tascam 122 MKII Master Casette Deck hooked up to the mixer through RCA plugs for times I need to take audio from cassette to the computer. Image

Now before we get the audio out of the mixer and into the computer let’s talk a bit about trim and gain staging. When I first hook up an audio source to a mixer I set the volume fader on that channel to unity(this is where the audio is neither being amplified nor attenuated). Next I use the input trim control and the audio meters to have the loudest sound at about 3/4 of the meter levels, well within the green. A slight bit of analog distortion from a loud signal adds “warmth” and “character” but digital distortion results in noise(clicks, crackles,etc.) so be very careful setting up your trim.

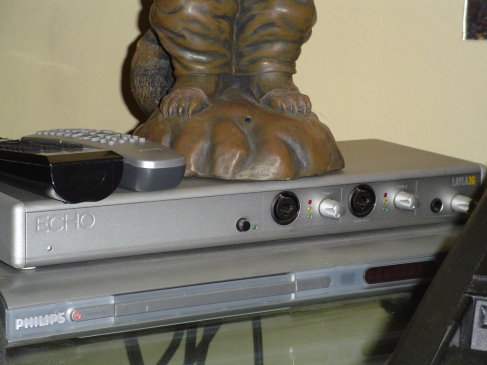
Getting back to the audio path, since I generally record one track at a time I use the main outs(two 1/4″ balanced lines- left and right) on the mixer to bring the audio into my soundcard’s breakout box. I use an Echo Layla 3G for a soundcard. Image

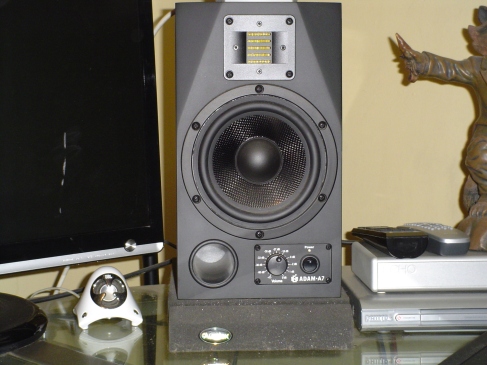
The breakout box offers 8 inputs and 10 outputs with mic preamps on channels 1 and 2. From here the sound is converted from analog to digital for use in my DAW. I also use 2 of the outputs to run XLR cables to my studio monitors- a pair of Adam Audio A7 speakers. Image In case you’re wondering, those foam pads under the speakers are decouplers(they act as “resistance” to vibrations that may travel through a desk surface thus affecting the listening environment). Specifically they are a product called MoPad manufactured by Auralex.

That’s it for how I get the audio into my DAW…we’ll look at MIDI connections another time. Hopefully this will help anyone taking their first steps in digital audio and setting up audio in a home studio. If you have any questions or comments don’t be afraid to post!

-Bill

Posted in Hardware, Tutorial | Tagged , , , , , , , , , | Leave a comment

The Best Orchestration Resource

If you’re looking to work with orchestration, whether in a pure classical setting or in some form of genre combination, you can never have enough information to hone your skills.

I posted some book recommendations last night but I forgot one that will give you the technique and knowledge you will need to create believable and effective orchestrations.

The Guide to Midi Orchestration by Paul Gilreath

This first half of the book deals strictly with the orchestra, section by section, beginning with the individual instruments and their range and use. From there the author slowly builds each section until finally combining all four sections and how to assign rhythmic and melodic phrases. The use of dynamics to build and release tension is discussed as well as lots of tips on scoring and transposition. This is the foundation you’ll need to be able to move into the second part of the book.

The second half of the book deals with Midi recording techniques. Articulations and dynamics are hard to create using software but using the tools found here will put you well on the road to symphonic joy. Choice of and proper use of specific software is considered here and you’ll find many valuable recommendations. Audio processing using plugins is also covered as well as mixing the complete piece.

I think you’ll be hard pressed to find a better well of learning any where, read and enjoy!

-Bill

Posted in Books, Tutorial | Tagged , , | Leave a comment

A Few Book Recommendations

Because of time constraints I won’t be back to writing and recording until this weekend so I thought I would share some of my recent relevant reads.

Sonar X1 Power- The Comprehensive Guide by Scott Garrigus

This book is pretty close to being the “Bible” of Sonar X1! Every aspect of Sonar is covered from setup to audio recording, Softsynths to Automation, it’s all here. It’s available as a over-size softcover or as a Kindle download. Scott is a regular over at the Cakewalk forums and is one of the most helpful and friendliest souls around. He also puts out a monthly newsletter called DigiFreq as a free service to the Cakewalk community and users worldwide.

Waves Plug-Ins Workshop: Mixing By the Bundle by Barry Wood

This softcover book works on the premise of mixing a complete song using various Waves plugin bundles starting with the Musician’s 2 Bundle and progressing up to the Mercury Bundle ( the full boat!). Mr. Wood not only shows you how to choose the relevant plugin for the task but also why and explains exactly how they work. If you go to the Waves website you will find Webinars from Mr. Wood going over these techniques.

Mixing and Mastering with IK Multimedia T-RackS: The Official Guide by Bobby Owsinski

The author of both The Mixing Engineer’s Handbook and The Mastering Engineer’s Handbook Mr. Owsinski is a renowned authority on everything audio! This book looks at both the mixing and mastering processes using T-RackS though the information is presented in such a way that users of other software will be able to use the same techniques using any software. Mixing and Mastering are a combination of science and magic and the author does a great job in bridging these two aspects of audio manipulation.

I highly recommend all 3 books, there’s plenty of important information inside!

-Bill

Posted in Books, Tutorial | Tagged , , , , , , , , | Leave a comment

Using a Default Project in Sonar X1

When I’m starting a new project in Sonar I have no idea what I’m going to call it until I get a ways into it. I’m also used to working a certain way in Sonar and X1 by default has a cramped and busy interface.

My solution to these two problems was to create a default project that looks the way I want interface-wise and allows me to use the Save As function to name the project at any point. Generally I have a Sonar Projects folder and place all projects inside, each in a folder with the project’s name. When Sonar opens I choose to open the Default project I created, start adding audio and softsynth tracks until I reach a point where a name comes to mind. At that point I manually create a folder with that name in the Sonar Projects folder and then use Save As function and save the project into the new folder using the same name as the project name (it’s very rare that my project folder and the project inside have different names). I have the option to save audio into the project folder rather than a general location to avoid confusion and make it easier to transfer projects between locations.

I’m using two Samsung 226BW 22″ monitors on my DAW machine and work with the Track View on the left monitor and the Console View on the right monitor. In track view I have the Multidock minimized as I have no use for it, the Track Inspector minimized to keep real estate for the tracks themselves, and the Browser minimized as my only use for it is to use it to call up softsynths once I have inserted them into the project. I like to move the softsynth or processor plugin to the right monitor so it’s fully visible without interrupting the Track View.

Here’s a look at the left monitor when I first open up the Default project- Leftmonitor

Here’s a look at the right monitor-
Rightmonitor

As an update I’m currently using Sonar X2 Producer Edition but my workflow remains the same.

-Bill

Posted in Software, Theory | Tagged , , , | Leave a comment

Sample Rate vs. Bit Rate Simplified

A lot of people have trouble discerning the difference between sample rate and bit rate when discussing digital audio so I thought I would give a simplified explanation to try and help out.

Sample rate refers to the frequency at which the sound source in a recording situation is sampled.

You’ve probably heard that CD quality recordings are at 44.1khz and DVD products can go from 96khz to 192khz depending on whether it’s a DVD-A, movie soundtrack, etc. Digital recording (which can also be called Digital Sampling) is a method whereby the recording device “samples” the sound source at timed intervals. Obviously the faster we sample the sound the more accurate the recording we’ll achieve. Picture our device sampling our sound source at 44,100 times a second…this gives us “CD Quality”(44.1khz). More than double that speed to 96,000 times a second and you’ve increased the precision, hence the quality of the recording. In easy to understand terms the higher the sample rate the higher the quality of the recording, but there is a trade-off… the higher we go in sample rate the larger the audio file becomes. CD Quality (44.1khz) was based on fitting a full album on a CD at the highest quality possible. Seeing as how the DVD has a larger storage capacity we can easily work with higher sample rates on that format.

There is an argument that at a certain point in sample rate we won’t be able to hear a difference any more but we’ll leave that discussion for another time.

Bit rate refers to how much information is sampled each time the recording device captures the sound source. We know that the faster we sample the better the quality of our recording, but if you are working a low bit rate you might not get the same result as using a larger bit rate at a lower sample rate. Some common bit rates are 8-bit (your Windows sounds are a good example of this), 16-bit (CD Quality), and 24-bit (DVD). Differences in bit rate affect the dynamic range of a recording (the difference between the quietest and loudest sounds). There is a 20-bit process that has been used but the general use audio rates are 8, 16, and 24.

For a point of reference I record my audio at 96khz and 24-bit. Everyone has their preference, you’ll just have to experiment to find what works for you. Just remember the higher the quality the greater the file size and the higher the load on your computer. You’ll also need a soundcard that can achieve the quality rate you wish to use.

There’s a ton of material on this subject so this is definitely an abridged version, if you’re interested in more information it’s out there…Google is your friend as they say.

-Bill

Posted in Theory, Tutorial | Tagged , , , | Leave a comment